YARN Architcure in Hadoop 2
Introduction
Hadoop 2 is generally available since October 2013. Key feature of the release is YARN ( Yet Another Resource Negotiator ). To understand YARN, let us have a brief overview of Hadoop 1 at first.
Hadoop 1 was designed on a single framework of MapReduce. It had NameNode, DataNode, JobTracker and TaskTracker at the core of computing. While that paradigm solved batch oriented web applications very well, there was need to use the clusters efficiently for varieties of workloads in addition to just MapReduce. If you remember, MapReduce embodies a data flow driven architecture that waits for Map phase to finish before Reduce phase can start. Originally designed MapReduce paradigm did not differentiate on available resources of the nodes in the cluster and how they could be co-shared with other useful tasks. It had a simple scheduler and JobTracker did the job co-ordination, from submission to execution. Maintenance and operation of large clusters also required human intervention. Similarly. the administration of the cluster with best practice was a constant learning experiment for varying jobs and data sets.
But, key benefit was how BIG storage was realized at scale and resiliency on commodity hardware. It was aided by replication and rack awareness of a task. That itself was BIG change to give Hadoop 1 all the credit it gets and we know the history.
Like many other things in life, technology matures and we need more from same. Hadoop 2 is designed to meet the changing need of its users. Hadoop 2 evolved with new theme. Its core theme is to use the cluster for varieties of workloads (streaming, graph database computing , hbase,encoding,mapreduce etc. ) in best possible resource sharing manner with capacity or fair scheduling of all resources of the cluster. As stated on Yahoo Developer site,
from an operational perspective, the Hadoop 1 MapReduce framework is simple, but it forces a system-wide upgrade for any minor or major changes such as bug fixes, performance improvements and features. Worse, it forces every single customer of the cluster to upgrade at the same time, regardless of his or her interests; this wastes expensive cycles of customers as they validate the new version of the Hadoop for their applications.
Now that YARN is released, there are two major enhancements compared to MapReduce paradigm of Hadoop 1.
HDFS Federation
In order to scale the name service horizontally, federation uses multiple independent Namenodes/Namespaces. The Namenodes are federated, that is, the Namenodes are independent and don't require coordination with each other. The datanodes are used as common storage for blocks by all the Namenodes. Each datanode registers with all the Namenodes in the cluster. Datanodes send periodic heartbeats and block reports and handles commands from the Namenodes.
MapReduce NextGen aka YARN aka MRv2
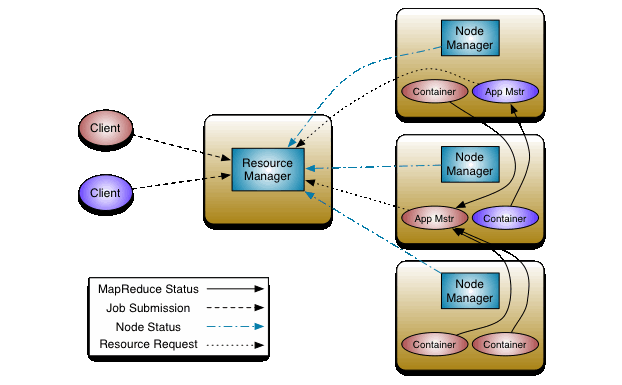
The new architecture introduced in Hadoop 2 and depicted in the top diagram above, divides the two major functions of the JobTracker: resource management and job life-cycle management into separate components.
The new ResourceManager manages the global assignment of compute resources to applications and the per-application ApplicationMaster manages the application‚ scheduling and coordination. An application is either a single job in the sense of classic MapReduce jobs or a DAG (directed acyclic graph ) of such jobs. The ResourceManager and per-machine NodeManager daemon, which manages the user processes on that machine, form the computation fabric. The per-application ApplicationMaster is, in effect, a framework specific library and is tasked with negotiating resources from the ResourceManager and working with the NodeManager(s) to execute and monitor the tasks.
Hadoop Job Submission
How do we differentiate between Hadoop 1 and 2 from developer an deployment perspective?
There are several ways to analyze two architectures. In this article, I take Job Submission approach. The way a job is submitted in Hadoop 2 is very different from Hadoop 1. To understand how jobs are executed in Hadoop 1 and 2, let us start with Hadoop 1 at first.
Hadoop 1 Job Submission Steps:
Here, you are submitting a MapReduce job like wordcount program that counts the number of words in a file. You MAP by the word and aggregate the count for each word in REDUCE phase. It has simple job mission flow.
Configuration config = new Configuration();
JobConf job = new JobConf(config);
job.setJarByClass(MyFirstJob.class);
job.setJobName("My first job");
FileInputFormat.setInputPaths(job, new Path(args[0));
FileOutputFormat.setOutputPath(job, new Path(args[1]));
job.setMapperClass(MyFirstJob.MyFirstMapper.class);
job.setReducerClass(MyFirstJob.MyFirstReducer.class);
JobClient.runJob(job);
As you see above, you instantiate JobConf class. There, you set several attributes like job name, input/output arguments, map and reducer classes. In the end, you submit the job to JobTracker.
Hadoop 2 Job Submission Steps :
In stead of wordcount above, let us run Unix Shell command like 'scp' in distributed manner using default scheduling and requested resources of cpu and memory with prescribed priority. At first, client submits the application aka distributed shell to the application manager which sits in Resource Manager. Resource Manager has a scheduler for resource allocation. Job History Server tracks the job status. Here, the Unix shell command is executed across the cluster in containers created by application master in name nodes. Container is provided with required resources. Container location is determined by the resource manager at the request of application master context. At very high level, container is old TaskNode while application master working with resource manager is new Job Tracker. Basically, old JobTracker is split into Application Master and Resource Manager.
The ResourceManager launches the ApplicationMaster on an allocated container. The ApplicationMaster is then expected to communicate with the ResourceManager using the 'ApplicationMasterProtocol'. Let us discuss job flow.
Firstly, the ApplicationMaster needs to register itself with the ResourceManager. To complete the task assigned to it, the ApplicationMaster can then request for and receive containers via ApplicationMasterProtocol#allocate. After a container is allocated to it, the ApplicationMaster communicates with the NodeManager using ContainerManager#startContainer to launch the container for its task. As part of launching this container, the ApplicationMaster has to specify the ContainerLaunchContext which, similar to the ApplicationSubmissionContext, has the launch information such as command line specification, environment, etc. Once the task is completed, the ApplicationMaster has to signal the ResourceManager of its completion via the ApplicationMasterProtocol#finishApplicationMaster.
Meanwhile, the client can monitor the application's status by querying the ResourceManager or by directly querying the ApplicationMaster if it supports such a service. If needed, it can also kill the application via ApplicationClientProtocol#forceKillApplication.
Important protocols in action are :
ApplicationClientProtocol - Client<-->ResourceManager
The protocol for a client that wishes to communicate with the ResourceManager to launch a new application (i.e. the ApplicationMaster), check on the status of the application or kill the application. For example, a job-client (a job launching program from the gateway) would use this protocol. See 1 and 3 below.
ApplicationMasterProtocol - ApplicationMaster<-->ResourceManager
The protocol used by the ApplicationMaster to register/unregister itself to/from the ResourceManager as well as to request for resources from the Scheduler to complete its tasks. See 2 below.
ContainerManager - ApplicationMaster<-->NodeManager
The protocol used by the ApplicationMaster to talk to the NodeManager to start/stop containers and get status updates on the containers if needed. See 4 below.
Let us look at code behind above protocols.
1) Connect to Resource Manager - Build appliacationManager instance.
ApplicationClientProtocol applicationsManager;
YarnConfiguration yarnConf = new YarnConfiguration(conf);
InetSocketAddress rmAddress =
NetUtils.createSocketAddr(yarnConf.get(
YarnConfiguration.RM_ADDRESS,
YarnConfiguration.DEFAULT_RM_ADDRESS));
// Get AppliationId
GetNewApplicationRequest request =
Records.newRecord(GetNewApplicationRequest.class);
GetNewApplicationResponse response =
applicationsManager.getNewApplication(request);
LOG.info("Got new ApplicationId=" + response.getApplicationId());
2) Build ApplicationSubmission and Container context - The main crux of a client is to setup the ApplicationSubmissionContext which defines all the information needed by the ResourceManager to launch the ApplicationMaster.
A client needs to set the following into the context:
// Create a new ApplicationSubmissionContext
ApplicationSubmissionContext appContext =
Records.newRecord(ApplicationSubmissionContext.class);
// set the ApplicationId
appContext.setApplicationId(appId);
// set the application name
appContext.setApplicationName(appName);
// Create a new container launch context for the AM's container
ContainerLaunchContext amContainer =
Records.newRecord(ContainerLaunchContext.class);
......
....
// Construct the command to be executed on the launched container
String command =
"${JAVA_HOME}" + /bin/java" +
" MyAppMaster" +
" arg1 arg2 arg3" +
" 1>" + ApplicationConstants.LOG_DIR_EXPANSION_VAR + "/stdout" +
" 2>" + ApplicationConstants.LOG_DIR_EXPANSION_VAR + "/stderr";
List<String> commands = new ArrayList<String>();
commands.add(command);
// Set the command array into the container spec
amContainer.setCommands(commands);
// Define the resource requirements for the container
Resource capability = Records.newRecord(Resource.class);
capability.setMemory(amMemory);
amContainer.setResource(capability);
// Set the container launch content into the ApplicationSubmissionContext
appContext.setAMContainerSpec(amContainer)
Left out code builds the container context with information about the distributed shell command, required resources, priority etc.
3) Submit the job - After the setup process is complete, the client is finally ready to submit the application to the ASM.
// Create the request to send to the ApplicationsManager
SubmitApplicationRequest appRequest =
Records.newRecord(SubmitApplicationRequest.class);
appRequest.setApplicationSubmissionContext(appContext);
applicationsManager.submitApplication(appRequest);
4) ResourceManager accepts the application and in the background, will go through the process of allocating a container with the required specifications and then eventually setting up and launching the ApplicationMaster on the allocated container. There are multiple ways a client can track progress of the actual task.
It can communicate with the ResourceManager and request for a report of the application via
ApplicationClientProtocol#getApplicationReport.
GetApplicationReportRequest reportRequest =
Records.newRecord(GetApplicationReportRequest.class);
reportRequest.setApplicationId(appId);
GetApplicationReportResponse reportResponse =
applicationsManager.getApplicationReport(reportRequest);
ApplicationReport report = reportResponse.getApplicationReport();
By understanding 3 protocols and 4 program flows above, you can develop valid YARN applications and submit the jobs. It is so routine that Cloudera has developed Kitten, found at https://github.com/cloudera/kitten to help write YARN applications. Kitten aims to handle the boilerplate aspects of configuring and launching YARN applications, allowing developers to focus on the logic of their application and not the mechanics of how to deploy it on a Hadoop 2 cluster.
Conclusion
Now, you have seen how Hadoop 1 and 2 differ in terms of job submission workflows. By understanding these job flows, you know how YARN truly distributes varieties of workloads across Hadoop cluster. Hadoop 2 avails all the benefits of Hadoop. It also enables true distributed computing with elasticity and scalability at the control of applications.
Reference
Hadoop 2 is generally available since October 2013. Key feature of the release is YARN ( Yet Another Resource Negotiator ). To understand YARN, let us have a brief overview of Hadoop 1 at first.
Hadoop 1 was designed on a single framework of MapReduce. It had NameNode, DataNode, JobTracker and TaskTracker at the core of computing. While that paradigm solved batch oriented web applications very well, there was need to use the clusters efficiently for varieties of workloads in addition to just MapReduce. If you remember, MapReduce embodies a data flow driven architecture that waits for Map phase to finish before Reduce phase can start. Originally designed MapReduce paradigm did not differentiate on available resources of the nodes in the cluster and how they could be co-shared with other useful tasks. It had a simple scheduler and JobTracker did the job co-ordination, from submission to execution. Maintenance and operation of large clusters also required human intervention. Similarly. the administration of the cluster with best practice was a constant learning experiment for varying jobs and data sets.
But, key benefit was how BIG storage was realized at scale and resiliency on commodity hardware. It was aided by replication and rack awareness of a task. That itself was BIG change to give Hadoop 1 all the credit it gets and we know the history.
Like many other things in life, technology matures and we need more from same. Hadoop 2 is designed to meet the changing need of its users. Hadoop 2 evolved with new theme. Its core theme is to use the cluster for varieties of workloads (streaming, graph database computing , hbase,encoding,mapreduce etc. ) in best possible resource sharing manner with capacity or fair scheduling of all resources of the cluster. As stated on Yahoo Developer site,
from an operational perspective, the Hadoop 1 MapReduce framework is simple, but it forces a system-wide upgrade for any minor or major changes such as bug fixes, performance improvements and features. Worse, it forces every single customer of the cluster to upgrade at the same time, regardless of his or her interests; this wastes expensive cycles of customers as they validate the new version of the Hadoop for their applications.
Now that YARN is released, there are two major enhancements compared to MapReduce paradigm of Hadoop 1.
HDFS Federation
In order to scale the name service horizontally, federation uses multiple independent Namenodes/Namespaces. The Namenodes are federated, that is, the Namenodes are independent and don't require coordination with each other. The datanodes are used as common storage for blocks by all the Namenodes. Each datanode registers with all the Namenodes in the cluster. Datanodes send periodic heartbeats and block reports and handles commands from the Namenodes.
MapReduce NextGen aka YARN aka MRv2
The new architecture introduced in Hadoop 2 and depicted in the top diagram above, divides the two major functions of the JobTracker: resource management and job life-cycle management into separate components.
The new ResourceManager manages the global assignment of compute resources to applications and the per-application ApplicationMaster manages the application‚ scheduling and coordination. An application is either a single job in the sense of classic MapReduce jobs or a DAG (directed acyclic graph ) of such jobs. The ResourceManager and per-machine NodeManager daemon, which manages the user processes on that machine, form the computation fabric. The per-application ApplicationMaster is, in effect, a framework specific library and is tasked with negotiating resources from the ResourceManager and working with the NodeManager(s) to execute and monitor the tasks.
Hadoop Job Submission
How do we differentiate between Hadoop 1 and 2 from developer an deployment perspective?
There are several ways to analyze two architectures. In this article, I take Job Submission approach. The way a job is submitted in Hadoop 2 is very different from Hadoop 1. To understand how jobs are executed in Hadoop 1 and 2, let us start with Hadoop 1 at first.
Hadoop 1 Job Submission Steps:
Here, you are submitting a MapReduce job like wordcount program that counts the number of words in a file. You MAP by the word and aggregate the count for each word in REDUCE phase. It has simple job mission flow.
Configuration config = new Configuration();
JobConf job = new JobConf(config);
job.setJarByClass(MyFirstJob.class);
job.setJobName("My first job");
FileInputFormat.setInputPaths(job, new Path(args[0));
FileOutputFormat.setOutputPath(job, new Path(args[1]));
job.setMapperClass(MyFirstJob.MyFirstMapper.class);
job.setReducerClass(MyFirstJob.MyFirstReducer.class);
JobClient.runJob(job);
As you see above, you instantiate JobConf class. There, you set several attributes like job name, input/output arguments, map and reducer classes. In the end, you submit the job to JobTracker.
Hadoop 2 Job Submission Steps :
In stead of wordcount above, let us run Unix Shell command like 'scp' in distributed manner using default scheduling and requested resources of cpu and memory with prescribed priority. At first, client submits the application aka distributed shell to the application manager which sits in Resource Manager. Resource Manager has a scheduler for resource allocation. Job History Server tracks the job status. Here, the Unix shell command is executed across the cluster in containers created by application master in name nodes. Container is provided with required resources. Container location is determined by the resource manager at the request of application master context. At very high level, container is old TaskNode while application master working with resource manager is new Job Tracker. Basically, old JobTracker is split into Application Master and Resource Manager.
The ResourceManager launches the ApplicationMaster on an allocated container. The ApplicationMaster is then expected to communicate with the ResourceManager using the 'ApplicationMasterProtocol'. Let us discuss job flow.
Firstly, the ApplicationMaster needs to register itself with the ResourceManager. To complete the task assigned to it, the ApplicationMaster can then request for and receive containers via ApplicationMasterProtocol#allocate. After a container is allocated to it, the ApplicationMaster communicates with the NodeManager using ContainerManager#startContainer to launch the container for its task. As part of launching this container, the ApplicationMaster has to specify the ContainerLaunchContext which, similar to the ApplicationSubmissionContext, has the launch information such as command line specification, environment, etc. Once the task is completed, the ApplicationMaster has to signal the ResourceManager of its completion via the ApplicationMasterProtocol#finishApplicationMaster.
Meanwhile, the client can monitor the application's status by querying the ResourceManager or by directly querying the ApplicationMaster if it supports such a service. If needed, it can also kill the application via ApplicationClientProtocol#forceKillApplication.
Important protocols in action are :
ApplicationClientProtocol - Client<-->ResourceManager
The protocol for a client that wishes to communicate with the ResourceManager to launch a new application (i.e. the ApplicationMaster), check on the status of the application or kill the application. For example, a job-client (a job launching program from the gateway) would use this protocol. See 1 and 3 below.
ApplicationMasterProtocol - ApplicationMaster<-->ResourceManager
The protocol used by the ApplicationMaster to register/unregister itself to/from the ResourceManager as well as to request for resources from the Scheduler to complete its tasks. See 2 below.
ContainerManager - ApplicationMaster<-->NodeManager
The protocol used by the ApplicationMaster to talk to the NodeManager to start/stop containers and get status updates on the containers if needed. See 4 below.
Let us look at code behind above protocols.
1) Connect to Resource Manager - Build appliacationManager instance.
ApplicationClientProtocol applicationsManager;
YarnConfiguration yarnConf = new YarnConfiguration(conf);
InetSocketAddress rmAddress =
NetUtils.createSocketAddr(yarnConf.get(
YarnConfiguration.RM_ADDRESS,
YarnConfiguration.DEFAULT_RM_ADDRESS));
// Get AppliationId
GetNewApplicationRequest request =
Records.newRecord(GetNewApplicationRequest.class);
GetNewApplicationResponse response =
applicationsManager.getNewApplication(request);
LOG.info("Got new ApplicationId=" + response.getApplicationId());
2) Build ApplicationSubmission and Container context - The main crux of a client is to setup the ApplicationSubmissionContext which defines all the information needed by the ResourceManager to launch the ApplicationMaster.
A client needs to set the following into the context:
- Application Info: id, name
- Queue, Priority info: Queue to which the application will be submitted, the priority to be assigned for the application.
- User: The user submitting the application
- ContainerLaunchContext: The information defining the container in which the ApplicationMaster will be launched and run. The ContainerLaunchContext, as mentioned previously, defines all the required information needed to run the ApplicationMaster such as the local resources (binaries, jars, files etc.), security tokens, environment settings (CLASSPATH etc.) and the command to be executed.
// Create a new ApplicationSubmissionContext
ApplicationSubmissionContext appContext =
Records.newRecord(ApplicationSubmissionContext.class);
// set the ApplicationId
appContext.setApplicationId(appId);
// set the application name
appContext.setApplicationName(appName);
// Create a new container launch context for the AM's container
ContainerLaunchContext amContainer =
Records.newRecord(ContainerLaunchContext.class);
......
....
// Construct the command to be executed on the launched container
String command =
"${JAVA_HOME}" + /bin/java" +
" MyAppMaster" +
" arg1 arg2 arg3" +
" 1>" + ApplicationConstants.LOG_DIR_EXPANSION_VAR + "/stdout" +
" 2>" + ApplicationConstants.LOG_DIR_EXPANSION_VAR + "/stderr";
List<String> commands = new ArrayList<String>();
commands.add(command);
// Set the command array into the container spec
amContainer.setCommands(commands);
// Define the resource requirements for the container
Resource capability = Records.newRecord(Resource.class);
capability.setMemory(amMemory);
amContainer.setResource(capability);
// Set the container launch content into the ApplicationSubmissionContext
appContext.setAMContainerSpec(amContainer)
Left out code builds the container context with information about the distributed shell command, required resources, priority etc.
3) Submit the job - After the setup process is complete, the client is finally ready to submit the application to the ASM.
// Create the request to send to the ApplicationsManager
SubmitApplicationRequest appRequest =
Records.newRecord(SubmitApplicationRequest.class);
appRequest.setApplicationSubmissionContext(appContext);
applicationsManager.submitApplication(appRequest);
4) ResourceManager accepts the application and in the background, will go through the process of allocating a container with the required specifications and then eventually setting up and launching the ApplicationMaster on the allocated container. There are multiple ways a client can track progress of the actual task.
It can communicate with the ResourceManager and request for a report of the application via
ApplicationClientProtocol#getApplicationReport.
GetApplicationReportRequest reportRequest =
Records.newRecord(GetApplicationReportRequest.class);
reportRequest.setApplicationId(appId);
GetApplicationReportResponse reportResponse =
applicationsManager.getApplicationReport(reportRequest);
ApplicationReport report = reportResponse.getApplicationReport();
By understanding 3 protocols and 4 program flows above, you can develop valid YARN applications and submit the jobs. It is so routine that Cloudera has developed Kitten, found at https://github.com/cloudera/kitten to help write YARN applications. Kitten aims to handle the boilerplate aspects of configuring and launching YARN applications, allowing developers to focus on the logic of their application and not the mechanics of how to deploy it on a Hadoop 2 cluster.
Conclusion
Now, you have seen how Hadoop 1 and 2 differ in terms of job submission workflows. By understanding these job flows, you know how YARN truly distributes varieties of workloads across Hadoop cluster. Hadoop 2 avails all the benefits of Hadoop. It also enables true distributed computing with elasticity and scalability at the control of applications.
Reference
- http://hadoop.apache.org/docs/current/index.html
- http://pcbje.com/2012/08/submitting-hadoop-mapreduce-jobs-to-a-remote-jobtracker/
- http://archive.cloudera.com/cdh5/cdh/5/hadoop/hadoop-yarn/hadoop-yarn-site/WritingYarnApplications.html
 RSS Feed
